WIP: Douglas A 4A (A 4D-1) Skyhawk Airfix 1/72 Parte 2
Olá Amigos! Hello
Estamos de volta com atualizações nas montagens em andamento.
A próxima fase no Skyhawk, depois de terminar o cockpit, são as modificações necessárias na fuselagem para modificar a versão B, do kit da Airfix, para a versão A.
O blog Tailhook Topics, que já comentei no outro post, trás um post exatamente sobre isso e indica com fotos as modificações necessárias, como essa abaixo.
We're back with updates on the builds in progress.
The next phase with the Skyhawk, after finishing the cockpit, is the necessary modifications in the fuselage to modify version B, from the Airfix kit, to version A.
The Tailhook Topics blog, which I commented in the other post, brings a post exactly about this and indicates with photos the necessary modifications, like this one below.
Partindo destas instruções do blog fiz as alterações no meu kit. Que ficou assim:
From the blog instructions I made the mods in the kit. It looks like that now:
As principais diferenças são o leme "liso" desta versão, que preenchi com putty (acima) e a falta da sonda de reabastecimento (abaixo). Também tirei as antenas que vieram nessa versão para recolocar outras novas ou modificadas.
The main differences are the "flat" rudder of this version, which I filled with putty (above) and the lack of the refueling probe (below). I also removed the antennas that came in this version to replace for new or modified ones.
O próximo passo é trabalhar nas cargas externas do nosso scooter. O Skyhawk foi originalmente desenvolvido como caça de ataque nuclear, por isso resolvi retratar um carga para esse tipo de missão com uma bomba nuclear MK 12 e dois tanques de 150 galões, já que a versão A ainda não usava os tanques de 300 galões. Abaixo uma foto das bombas utilizadas nos anos 50 pelo Skyhawk, retirada do livro Scooter! do Tommy Thomason.
The next step is to work on the external loads of our scooter. Skyhawk was originally developed as a nuclear attack fighter, so I decided to build it for this type of mission with an MK 12 nuclear bomb and two 150-gallon tanks, since version A did not use 300-gallon tanks. Below is a photo of the bombs used in the 1950s by the Skyhawk, taken from the book Scooter! By Tommy Thomason.
No blog do Thommy achei esses diagramas em escala das bombas nucleares da época e dos tanques da Douglas. Então foi só desenhar uma MK 12 na escala correta e dar um jeito de reproduzir a arma.
On Tommy's blog I found these scale diagrams of the nuclear bombs of the time and the Douglas tanks. So it was only draw a MK 12 on the correct scale and manage to reproduce the weapon.
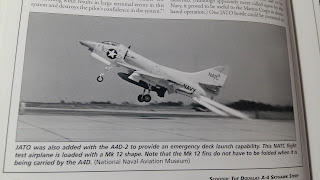
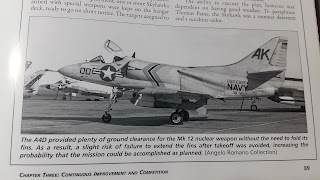
No mesmo livro achei algumas fotos do caça com a MK 12 no pilone central, essas fotos foram importantes porque a arma inicial e padrão era a bomba MK 7, bem maior, que inclusive explica o trem de pouso bem alto do Skyhawk.
In the same book I found some pictures of the MK 12 in the fighter on the central pylon, these photos were important because the initial and standard weapon was the much larger MK 7 bomb, which even explains the skyhawk high landing gear.
Os tanques de 150gl foram feitos a partir dos tanques de 300 que vieram no kit. Na verdade foi bem fácil, apenas retirei uma secção na medida certa do corpo do tanque e reduzi as aletas. O tanque que a Airfix colocou no kit está errado, com a secção central reta e não curva como e o correto, e exatamente isso facilita a construção da versão menor.
The 150gl tanks were made from the 300 tanks that came in the kit. It was actually quite easy, I just pulled out a section on the right size of the tank body and reduced the fins. The tank that Airfix molded in the kit is wrong, with the center section straight and not curved like the correct one, and exactly this facilitates the construction of the smaller version.
Já a MK 12 vou tentar fazer utilizando o tanque central que também vem no kit. Aqui terei mais trabalho, mas vamos ver o resultado no próximo post!
Already the MK 12 I will try to make using the central tank that also comes in the kit. Here I will have more work, but we will see the result in the next post!


Comentários
Postar um comentário