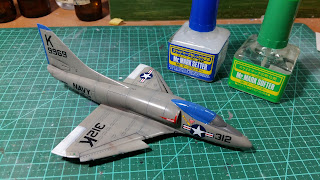
WIP: Douglas A 4A (A 4D-1) Skyhawk Airfix 1/72 Parte 4
Olá pessoal! Hello!
Vamos seguindo com o nosso Skyhawk, que já está entrando na reta final.
Depois de terminada a pintura, selamos a mesma com duas demãos de verniz brilhante, aplicamos os decais (metade do set do kit novo e metade dos decais antigos), que aliás, foram perfeitos, inclusive os antigos. O único problema foram os decais de alerta que ficam na entrada de ar das turbinas, que são muito mal desenhados e não se moldam direito sobre a superfície curva.
Let's keep going with our Skyhawk, which is already entering the final stretch.
After the painting was finished, we sealed it with two coats of gloss varnish, applied the decals (half part of the new kit decals and half of the old), which, went perfect, including the old ones. The only problem was the "danger" decals of the engine intakes, which were very difficult to put in the a right way on the curved surface.
Utilizei amaciante e selador de decais da Mr. Hobby, que são muito bons também. Na verdade os decais da Airfix sempre são de razoáveis para bons e dão poucos problemas.
I used decal softer and setter from Mr. Hobby, which are very good too. Actually Airfix decals usually are good.
O problema da entrada de ar teve que ser resolvido na tinta, o que sempre é um pouco complicado pois temos que mascarar tudo muito bem para evitar qualquer erro. Depois foi aplicar verniz fosco e finalizar o kit. Só que não! O verniz craquelou em alguns lugares, talvez pelo excesso de camada ou a temperatura do ar estar elevada. Solução? Lixar a superfície com lixa 1000 a 2000 e muita paciência para contornar o problema.
The problem of the air intake had to be solved with painting, which is always a little complicated because we have to mask everything very well to avoid any mistake. Then I applied matt varnish and finished the kit. But no! The varnish cracked in some places, perhaps because of the excess layer of varnish or the temperature of the air being elevated. Solution? Sand the surface with 1000 to 2000 grain sandpaper and lots of patience to get around the problem.
Depois desta batalha resolvi retirar o canopy e melhorar o encaixe do mesmo, que tinha ficado um pouco fora da posição.
After the varnish battle I removed the canopy to improve the fit as it was glued out of position.
Já é hora de colar tudo no lugar e agora sim, terminar o kit!
Now it is time to put everything together and finish it!


Belíssima montagem
ResponderExcluir