WIP: Racing Pilot 1/12 "Ayrton Senna" Parte 2

We returned to the Ayrton Senna figure in the 1/12 scale. In the last post I had started to paint the face of the figure, but my mixture of colors had become very bad. In this way, talking to some friends who are quite good in figures painting, I redid the painting job.

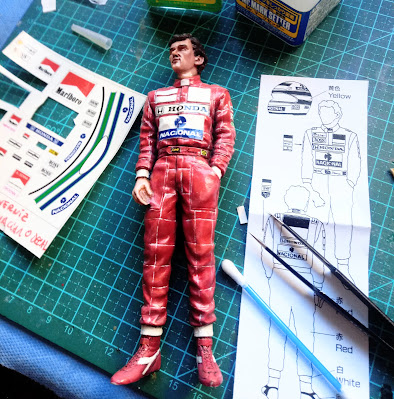
O resultado agora ficou bem mais realista, com tom de pele mais rosado. Desta vez a mistura que fiz foi Siena, Amarelo ouro, Vermelho e branco para adicionar as luzes.

The result is now much more realistic, with a more real skin tone. This time the mixture I made was Siena, Yellow gold, Red and white to add the lights.


Depois dos óleos e washes passei para os decais e foi aí que a montagem ficou bem complicada! Os decais fornecidos junto com o kit são muito espessos e duros, quase impossível de aplicar! Passei um verniz novo sobre eles e usei bastante decal softer e setter da Mr. Hobby sem nenhum resultado satisfatório!


Em um primeiro momento mascarei com fita todas as cores para fazer algo que ficasse o mais parecido com o desenho do capacete original. Claro que infelizmente não consegui fazer as listras de forma fiel ao capacete que tem detalhes muito pequenos. Logo vi que isso estava além da minha habilidade e paciência!

O resultado inicial com as máscaras não ficou legal, a própria tinta acrílica tem pouca aderência uma sobre a outra, o que acabou comprometendo o resultado final.

A solução agora é partir para o estilo "old school" usando fita para guiar a pintura feita a mão, com pincel bem fino.

O resultado não ficou tão ruim, um pouco de paciência e precisão deu resultado. Depois das listras, mais X-22 e vamos para os decais dos patrocinadores. Novamente foi um pesadelo!

Como retirei as luvas da figura, que estavam na mão direita da mesma, tive que colocar elas em algum lugar. Então optei em fazer duas luvas com massa epóxi Tamiya e inserir elas dentro do capacete.


Faltava apenas a viseira, que reproduzi com recorte de lâmina de PET transparente e encaixei com cabeças de alfinete cortadas e coladas no capacete.

O resultado ficou bem convincente, embora os decais sejam muito grossos e com pouca aderência.

Depois da pele e cabelos prontos, passei duas camadas de Clear X-22 da Tamiya em todo o modelo. Essa base bem lisa e brilhante ficou perfeita para o trabalho com alguns óleos nas cores branca, marrom e preto. Aproveitei para fazer alguns washes com o Line Wash da AMMO.
After the skin and hair ready, I applied two layers of Clear X-22 by Tamiya. This very smooth and shiny base was perfect for working with some white, brown and black oils. I took the opportunity to do some washes with AMMO's Line Wash.

After the oils and washes I moved to the decals and that was when the build got really complicated! The decals supplied with the kit are very thick and hard, almost impossible to apply! I put a new varnish on them and used a lot of Mr. Hobby decal softer and setter without any satisfactory results!

De qualquer maneira finalizei a figura, pelo menos grande parte dela, com uma camada de Clear Flat XF-86 da Tamiya.
Agora ficou faltando o capacete, e esse é quase um capitulo a parte. A peça foi preparada para pintura com primer e uma base amarela. Na teoria seria somente aplicar os decais das listras do característico capacete do chefe.
Anyway, I finished the figure, at least a large part of it, with a layer of Clear Flat XF-86 from Tamiya.
Now the helmet is missing, and this is almost a separate project. The piece was prepared for painting with primer and a yellow base. In theory, it would only apply the decals of the stripes of the "Boss" characteristic helmet.

Porém, a tentativa de usar os decais do kit não deram certo. Eles simplesmente não conformaram no formato do capacete. Desta forma resolvi pintar as listras!
However, the attempt to use the kit decals did not work again. They just didn't conform to the shape of the helmet. So I decided to paint it!

At first I masked all colors with tape to make something that looked as similar to the design of the original helmet. Of course, unfortunately I couldn't make the stripes faithfully to the helmet, which has very small details. Soon I saw that this was beyond my skill and patience!

The initial result with the masks was not good, the acrylic paint itself has little adherence to the base, which ended up compromising the final result.

The solution now is to go to the "old school" style using tape to guide the painting done by hand, with a very fine brush.

The result was not that bad, a little patience and precision worked well. After the stripes, another layer of X-22 and we go to the sponsors decals. Again it was a nightmare!

As I removed the gloves from the figure, which were in the right hand, I had to put them somewhere. So I chose to make two gloves with Tamiya epoxy putty and insert them inside the helmet.

Depois de modeladas e recortadas, foram pintadas de branco e vermelho para combinar com o restante do macacão da Mclaren.
After being build and cut, they were painted white and red to match the rest of the Mclaren overalls.

Only the visor was missing, which I reproduced with a cutout of a transparent PET sheet and fitted with pin heads cut and glued to the helmet.

The result was quite convincing, although the decals are very thick and poor fitting.


Com o capacete pronto, chegamos ao fim da montagem. Vamos colar a figura na base, mas isso você verá no post final com as fotos mais produzidas do modelo finalizado!
With the helmet ready, we finished the build. We will glue the figure on the base, but you will see it in the final post with the finished model!


Comentários
Postar um comentário