WIP: Vought F4U-1D Corsair 1/72 Tamiya Parte 1
Olá pessoal! Hello!
Esse ano está sendo um ano mais complicado para as minhas montagens, mas seguimos com algumas coisas na bancada que quero trazer aqui para vocês!
This year is proving to be a more complicated year for my builds, but we keep going with some things on the bench that I want to bring here for you!
Eu gosto muito do clássico Vought F4U Corsair, inclusive já montei dois e tenho ainda mais 2 para montar. Como passei alguns "apuros" montando kits shortrun ou antigos ultimamente, resolvi ceder um pouco a montar um Tamiya, no caso o F4U-1D da marca.
I really like the classic Vought F4U Corsair, which I already built two and I still have two more to build. As I had some "trouble" assembling short run or old kits lately, I decided to give up a little bit to build a Tamiya, the F4U-1D from the brand.
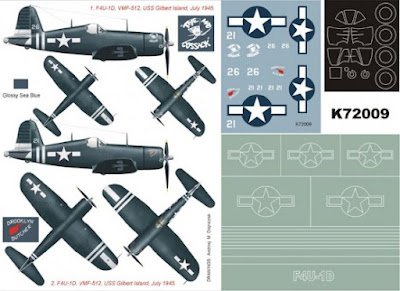
Como todo mundo sabe os kits da Tamiya são espetáculos a parte e esse segue a linha. Belos detalhes, injeção perfeita e encaixes e engenharia muito corretos. No meu kit o único problema era a folha de decais que substitui por um da Montex com as mascaras (item K72009).
As everyone knows Tamiya's kits are a sideshow and this one follows the line. Beautiful details, perfect injection and very correct fittings and engineering. In my kit the only problem was the decal sheet that I replaced with one from Montex with masks (item K72009).
A montagem se iniciou pelo interior, com a utilização de primer Preto da AK (AK178), no motor e cockpit. As peças menores receberam o primer direto nos sprues.
The assembly began with the interior, with the use of the Black Primer from AK (AK178), including engine and cockpit. The minor pieces received the primer direct on the sprues.
In the sequence I applied my homemade formula of acrylic paint for the green of the inner part of the fuselage and the cockpit. Details were done with black paint and aluminum, with black wash by AMMO.
The cockpit is very detailed and the kit brings the details of the panel in decal. On this small scale, it's pretty reasonable.
The belts are a leftover Eduard PE set that I had on hand.
Engine is barely visible, but it was finished with AMMO Metal acrylic paint and the details in medium gray. And of course, a little more AMMO wash.
With the internal parts ready, we go to the external area with the application of AK Interactive's black primer. I only had to apply one hand, with some corrections on some spots of surface of the kit.
Now it's time of the final paint job. Remembering that this set of decals from Montex has the masks for the cockpit and also to make the white details on the wings and tail of the Corsair.
The color used in addition to the acrylic white, was the Dark Sea Blue from Hataka, with different effects where I used white and medium blue for highlights.
Now it's time to move on to the varnish and finish the plane's weathering effects. Stay tuned!


Comentários
Postar um comentário