WIP: Alenia Aermacchi/Embraer AMX A-1 1/48 Hobbyboss Parte 2
Seguimos acelerado com o AMX A-1A da Força Aérea Brasileira, montagem para um querido amigo. No último post falamos até a aplicação do primer, agora é hora de começar a pintura padrão da FAB.
We continued with the AMX A-1A of the Brazilian Air Force, build for a dear friend. In the last post we talked about the application of the primer, now it's time to start the BAF camo.

No manual de montagem do kit, as cores indicadas são Dark Green H302 e Medium Grey H306, mas como esse manual da Hobbyboss não é muito confiável, vamos para outras fontes. A Hataka e a FCM Decais cita Verde Escuro FS 34092 e Cinza neutro FS 36176.

In the kit manual, the colors indicated are Dark Green H302 and Medium Grey H306 but as this Hobbyboss manual is not very reliable, we must check other sources. Hataka and FCM Decals show Dark Green FS 34092 and Neutral Gray FS 36176 as the correct colors.

As I didn't have any of these colors I specifically chose the ones that came closest to it in my stock. So I used RLM 73 AK2022 and Ocean Gray AK2014 from AK Interactive.

Even though the scale is a little bigger, I decided to make the camouflage with putty masks, I think the edges look more beautiful. In this kit, again, I did not do the pre shading, only the post shading adding the effects on the base color.

Acho o resultado usando o pós shading mais fácil de controlar e também mais realista. É uma percepção pessoal, e também reforçada porque em cores mais escuras, como esse verde, o pré shading praticamente perde suas vantagens.
I think the result using pos shading easier to control and also more realistic. It is a personal perception, and also reinforced because in darker colors, like this green, pre shading practically loses its advantages.

Um dado importante para essa camuflagem, que não é nada clara nas instruções do kit, é que o verde da parte superior também aparece abaixo das asas.
An important fact for this camouflage, which is not at all clear in the kit instructions, is that the green at the top also appears below the wings.

Acabei me dando conta disso depois de praticamente finalizar a pintura, mas é fácil de fazer com um pouco de mascaramento. Por isso a importância de sempre analisar outras referências além das que vem junto ao kit.
I ended up realizing this after practically finishing the painting, but it is easy to do with a little masking. So the importance of always analyzing other references besides those that come with the kit.


Depois de pintura finalizada, aplicamos o verniz brilhante da Tamiya (X-22).
After painting is finished, we apply Tamiya's gloss varnish (X-22).

Também começamos a parte final das cargas externas; os tanques de combustivel, as BGL e os misseis Piranha, ambos pintados como versões de manejo.
We also started the final part of the external loads, like the fuel tanks, the LGBs and the Piranha AA missiles, both painted as handling versions.

It is time to weathering, washes, oils, pastels and pigments. All we can add!


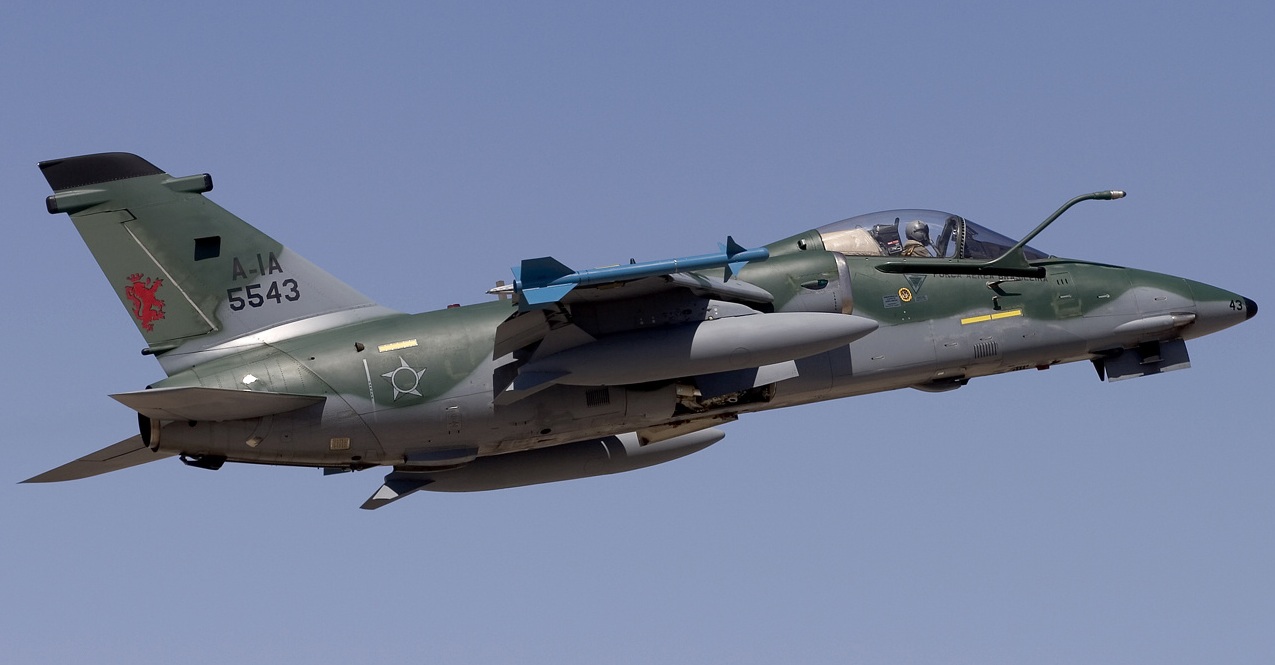
Um aspecto interessante dos A-1 é que eles sujam muito na parte inferior traseira da fuselagem, várias fotos tem esse aspecto (veja abaixo). Na junção da fuselagem que é destacada para tirar o motor também. Infelizmente o kit da HB não é bem detalhado nessa parte, inclusive faltando várias linhas dos painéis.
An interesting aspect of the A-1s is that they are very dirty on the bottom rear of the fuselage, several photos have these aspects (see below). At the junction of the fuselage that is removed to take the engine out too. Unfortunately the HB kit is not very detailed in this part, even missing several panel lines.

Outro erro da Hobbyboss é que o manual indica as cargas externas de forma não usual, com as bombas nos pilones externos e os tanques nos internos. Grande parte das vezes a aeronave aparece com as cargas ao contrário, como na foto acima. Resolvi alterar isso no meu modelo.
Another Hobbyboss mistake is that the manual indicates external loads in an unusual way, with the bombs on the external pylons and the tanks on the internal ones. Most of the time the aircraft appears with opposite loads, as in the photo above. I decided to change it in my model.

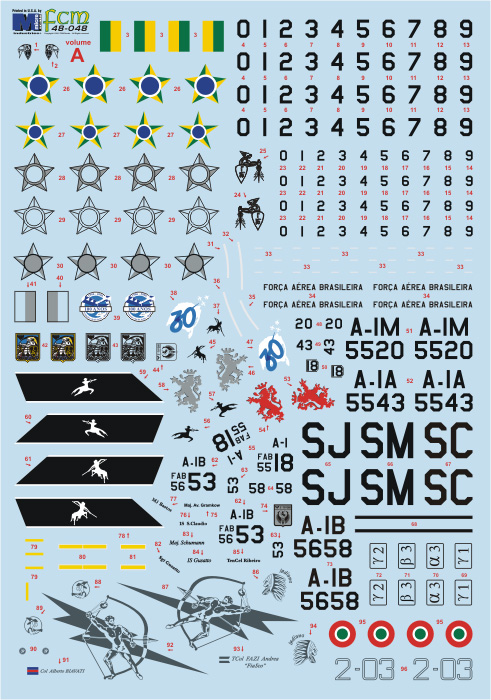
Chegamos nos decais e aqui tem algumas considerações a fazer. Primeiro, em termos de qualidade de aplicação os decais não são ruins, bem impressos, no registro e se moldam bem no kit.
We arrived at the decals and here we have some considerations to make. First, in terms of application quality, decals are not bad, well printed, on the register and fit well into the kit.

The big problem is due to its accuracy. Wrong colors, missing identifications, stencils in Italian not in portuguese, wrong fonts. That is, a mess! I strongly recommend buying an aftermarket sheet like that from FCM decals:
Depois dos decais e wheatering passamos para o os acabamentos, com alguns retoques e o verniz fosco. Usei o verniz Lucky da AMMO by Mig e novamentre não gostei muito do acabamento, muito áspero. Nunca me acertei com esse verniz, mas o resultado visual ficou bom.
After decals and wheatering, we moved on to the finishing, with some retouches and matte varnish. I used the Lucky varnish from AMMO by Mig and again I didn't like the finish, very rough. I could never do it right with this varnish, but the visual result was good.

Agora é a reta final. colar as peças menores (antenas, portas etc...) e o trem de pouso. Aliás, esse kit vem com os pneus de borracha, que dão um toque muito legal ao modelo. Claro, que sempre ficamos com um pé atrás dessas peças de borracha porque costumam degradar com o tempo.
Now is the final stretch. glue the smaller pieces (antennas, doors etc ...) and the landing gear. In fact, this kit comes with rubber tires, which give a very nice touch to the model. Of course, we always have some doubts of these pieces of rubber because they tend to degrade over time.

No próximo post volto com as fotos do modelo finalizado!
In the next post I will be back with the finished model!
Link da FCM Decais: https://www.fcm.eti.br/index.html

Comentários
Postar um comentário